Building a Social Image Generator Console Application
For a while now I've been adding an image for when my posts get shared on Twitter and the like. It's been a manual process where I open up Photoshop and manually update the text. I wanted to change that to make it faster for me to create, so I wrote up a quick .NET console app to go about doing that and will share with you how to build your own.
The first thing I had to do was build the template. I used Photoshop to build it, but you can use whatever graphics tool you would like such as Gimp or Paint.net.

The console application is reliant upon the SixLabors Image and Font Libraries as I wanted this to work on both Windows & MacOS. Unforunately Microsoft's System.Drawing.Common library is dependent upon Windows libraries so MacOS would be a no-go.
Setup your project
$> dotnet new console --name SocialImageGenerator
$> cd SocialImageGenerator
Install the dependencies
$> dotnet add package SixLabors.Fonts
$> dotnet add package SixLabors.ImageSharp
$> dotnet add package SixLabors.ImageSharp.Drawing
I still prefer the old program style so I reset the Program.cs file to use the .NET 5 template and added all the usings. I replaced the generated code with the following.
using SixLabors.Fonts;
using SixLabors.ImageSharp;
using SixLabors.ImageSharp.Processing;
using SixLabors.ImageSharp.Drawing.Processing;
using SixLabors.ImageSharp.Formats.Jpeg;
using SocialImageGenerator.Models;
using System;
using System.IO;
using System.Runtime.InteropServices;
using System.Threading.Tasks;

namespace SocialImageGenerator;

internal class Program
{

}
Get the data for image generation
In order for the image to be generated I need 3 pieces of information.
- The date posted
- The title of the post
- The URL slug of the post
I might eventually see if I can automatically generate some of them, but for the moment, the app will prompt me to enter the data into the console. If you feel you need less, by all means, trim the inputs down.
The code to do this is pretty simple. I prompt the user to enter the data, and use the Console.ReadLine() function to assign the entered value to a variable. The only slight complication is to handle the date. To save some time, I added the ability to "skip" the date entry and default it to the current date. The GetPostDate function will then try to parse the entry and assign it to the current date if it fails for whatever reason.
static DateTime GetPostDate(string enteredDate)
{
    DateTime postDate;

    if (!DateTime.TryParse(enteredDate, out postDate))
    {
        postDate = DateTime.Now;
    }

    return postDate;
}

static PostData GetPostData()
{
    Console.Write($"Enter the post's date (defaults to {DateTime.Now.ToString("yyyy-MM-dd")}): ");

    var date = Console.ReadLine();

    var postDate = GetPostDate(date ?? "");

    Console.Write($"Enter the post's Title: ");

    var postTitle = Console.ReadLine();

    Console.Write($"Enter the post's slug: ");

    var postSlug = Console.ReadLine();

    return new PostData
    {
        Title = postTitle ?? "",
        Slug = postSlug ?? "",
        PostDate = postDate,
    };
}
You'll notice that I created a PostData class to store the data. I take advantage of properties to make things simpler for me. You'll see where Url and Directory get used later.
using System;

namespace SocialImageGenerator.Models;

public class PostData
{
    public string Title { get; set; } = string.Empty;

    public string Slug { get; set; } = string.Empty;

    public DateTime PostDate { get; set; } = DateTime.Now;

    public string Url => $"kpwags.com/posts/{PostDate.ToString("yyyy")}/{PostDate.ToString("MM")}/{PostDate.ToString("dd")}/{Slug}";

    public string Directory => $"{PostDate.ToString("yyyy")}-{PostDate.ToString("MM")}-{PostDate.ToString("dd")}-{Slug}";
}
So now let's have the main program actually prompt the user for the data. In Program.cs, let's add this to the Main function.
internal class Program
{
    static PostData? data;

    static async Task Main(string[] args)
    {
        data = GetPostData();

        if (data is null)
        {
            Console.WriteLine("Unable to generate post data");
            return;
        }
    }
}
I create a global variable data to hold the post data and then assign it the value the GetPostData() function returns. If for whatever reason it fails, it should still be null so I error out and exit.
Writing the text on the image
The next step is to actually go about adding the text to the image. To keep Main clean, I'm going to create a function called BuildImage to do the image and text manipulation.
static async Task BuildImage()
{

}
The first thing we're going to want to do is load the template image. To do that, we'll use SixLabor Image library to do that. My template image is called Template.jpg and it is in the project's root directory.
using var image = Image.Load("Template.jpg");This will load the image into memory so that we can overlay the text on it.
The next step is to load our fonts. I use the Work Sans font and have the variable font file worksans.ttf stored in my root directory as well.
var fontCollection = new FontCollection();

fontCollection.Add("worksans.ttf");

if (fontCollection.TryGet("Work Sans", out FontFamily family))
{

}
This code looks to grab the font file and create the font family object the image library can use to write to the image.
The next step is to write the title of the post to the image.
var font = family.CreateFont(60, FontStyle.Bold);

var options = new TextOptions(font)
{
    Origin = new PointF(40, 60),
    WrappingLength = 600,
    HorizontalAlignment = HorizontalAlignment.Left,
};

var rect = TextMeasurer.Measure(data.Title, options);

image.Mutate(x => x.DrawText(options, data.Title, Color.White));
The first step is to create the font I want to use. In this case I want to use the Work Sans font I defined above with the size 60pt and bolded.
The second step here is to define the font styling. The origin is the (x, y) coordinate of the template image you want to start drawing to. For me, I had to open up Photoshop to determine this point. The wrapping length is the number of pixels you want the text to go before it wraps to the next line. In my case, I want it to span 600 pixels before wrapping. The horizontal alignment should be pretty self-explanitory. I want the text to align to the left.
The next step is where I draw the rectangle where the text is written. It takes two arguments. The first is the text I'm writing, in this case the title of the post. The second argument is the options for the font. This way it can calculate what size the rectangle is that is holding the title of the post on the image. You'll see where I use this later.
The final step here is to apply the mutation to the image. In this case, I'm telling ImageSharp to draw the title of the post on the image with the text options I defined in the color white.
For my social image, I also want the URL of the post displayed in the image, so I repeat this for the URL.
var urlFont = family.CreateFont(24, FontStyle.Regular);

var urlOptions = new TextOptions(urlFont)
{
    Origin = new PointF(40, 80 + rect.Height),
    WrappingLength = 600,
    HorizontalAlignment = HorizontalAlignment.Left,
};

image.Mutate(x => x.DrawText(urlOptions, data.Url, Color.White));
Again, I create the font, this time with size 24pt and not bolded.
I also create the Text options, only this time I specify the Y coordinate as the height of the title box + 80 to give it some padding. This is why I created the rect object above. I'm not always going to be sure how much space the title is going to take up as my blog post titles vary. The rect object will tell me how much height the title will take up, then I add an additional 80 pixels to give it some space.
This is the final piece of text I'm writing, so I don't need to bother creating another rectangle. The final part is writing this bit to the image.
You'll also notice here is where I use the Url property of the PostData class.
Saving the image to disk
The final step of the process is to save the image to disk so it can be used.
using var ms = new MemoryStream();

await image.SaveAsync(ms, new JpegEncoder());

var imageData = ms.ToArray();

await image.SaveAsJpegAsync(BuildFilePath());
I create a MemoryStream, and then save the image with the 2 mutations to the MemoryStream using the JPEG encoder. The next step is to then save it to disk using the image.SaveAsJpegAsync() function. To save myself so time, I created a function called BuildFilePath() that creates the directory and returns the path.
static string BuildFilePath()
{
    if (data is null)
    {
        throw new Exception("Post Data is null");
    }

    string rootDirectory = string.Empty;

    if (RuntimeInformation.IsOSPlatform(OSPlatform.OSX))
    {
        rootDirectory = "/Users/keith/Developer/kpwags.com/public/images/posts";
    }
    else if (RuntimeInformation.IsOSPlatform(OSPlatform.Windows))
    {
        rootDirectory = @"C:\Users\keith\Developer\kpwags.com\public\images\posts";
    }
    else
    {
        throw new Exception("Invalid Operating System");
    }

    var directory = Path.Join(rootDirectory, data.Directory);

    if (!Directory.Exists(directory))
    {
        Directory.CreateDirectory(directory);
    }

    return Path.Join(directory, "social-image.jpg");
}
This has a little bit of hard-coding as it's specific to my enviroments and it might be useful to put some of this in an appsettings.json file, but for now, It's just spelled out.
Since I will sometimes be on Windows when I work, I wanted to make sure this works on either. I use the System.Runtime.InteropServices library to check the operating system I'm using and assign the root directory based on that. I want this to go to where my blog is hosted so there's no additional steps I need to take to publish. This is the hardcoding that could be moved to a config file.
Now that the directory is defined, I check to see if it exists, and if it doesn't, I create it. Then I return it with the image filename social-image.jpg appended to it.
Note that this is where I use the Directory property on the PostData object.
All that's left to do is have the Main function calll the BuildImage() function.
internal class Program
{
static PostData? data;
static async Task Main(string[] args)
{
data = GetPostData();
if (data is null)
{
Console.WriteLine("Unable to generate post data");
return;
}
await BuildImage();
}
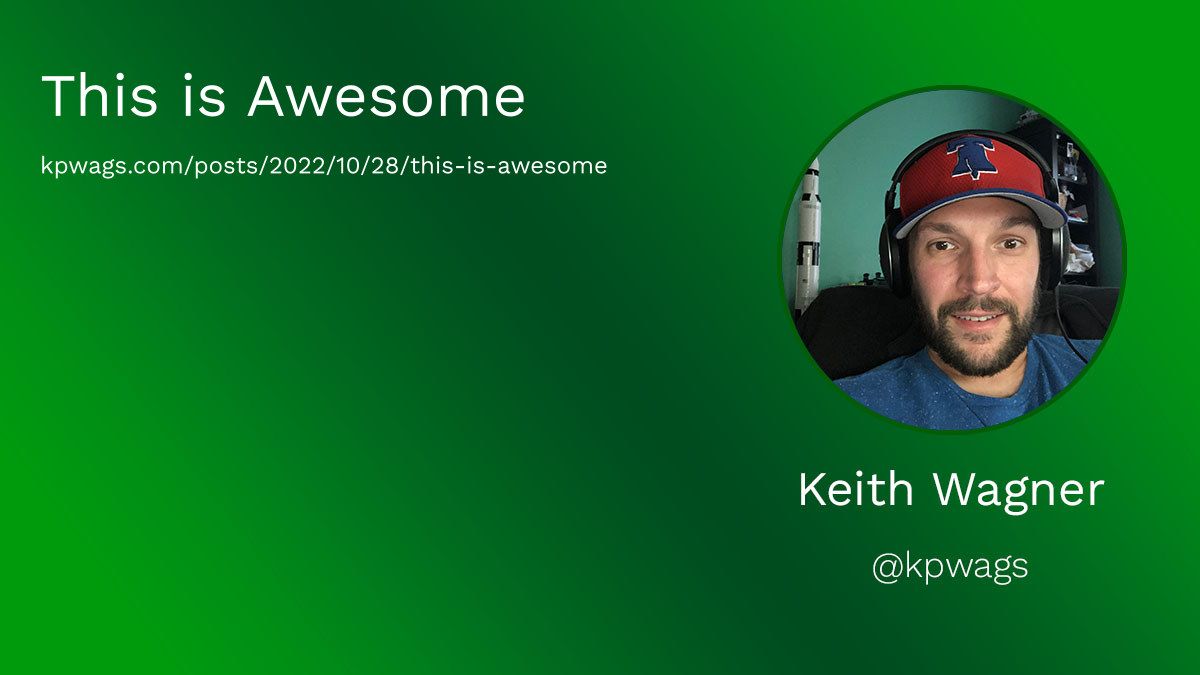
}After this, it's all done. The image is saved and the app exits. The final product of this little app is:
Here is the final Program.cs file
using SixLabors.Fonts;
using SixLabors.ImageSharp;
using SixLabors.ImageSharp.Processing;
using SixLabors.ImageSharp.Drawing.Processing;
using SixLabors.ImageSharp.Formats.Jpeg;
using SocialImageGenerator.Models;
using System;
using System.IO;
using System.Runtime.InteropServices;
using System.Threading.Tasks;

namespace SocialImageGenerator;

internal class Program
{
    static PostData? data;

    static async Task Main(string[] args)
    {
        data = GetPostData();

        if (data is null)
        {
            Console.WriteLine("Unable to generate post data");
            return;
        }

        await BuildImage();
    }

    static DateTime GetPostDate(string enteredDate)
    {
        DateTime postDate;

        if (!DateTime.TryParse(enteredDate, out postDate))
        {
            postDate = DateTime.Now;
        }

        return postDate;
    }

    static PostData GetPostData()
    {
        Console.Write($"Enter the post's date (defaults to {DateTime.Now.ToString("yyyy-MM-dd")}): ");

        var date = Console.ReadLine();

        var postDate = GetPostDate(date ?? "");

        Console.Write($"Enter the post's Title: ");

        var postTitle = Console.ReadLine();

        Console.Write($"Enter the post's slug: ");

        var postSlug = Console.ReadLine();

        return new PostData
        {
            Title = postTitle ?? "",
            Slug = postSlug ?? "",
            PostDate = postDate,
        };
    }

    static async Task BuildImage()
    {
        if (data is null)
        {
            throw new Exception("Post Data is null");
        }

        using var image = Image.Load("Template.jpg");

        var fontCollection = new FontCollection();

        fontCollection.Add("worksans.ttf");

        if (fontCollection.TryGet("Work Sans", out FontFamily family))
        {
            var font = family.CreateFont(60, FontStyle.Bold);

            var options = new TextOptions(font)
            {
                Origin = new PointF(40, 60),
                WrappingLength = 600,
                HorizontalAlignment = HorizontalAlignment.Left,
            };

            var rect = TextMeasurer.Measure(data.Title, options);

            image.Mutate(x => x.DrawText(options, data.Title, Color.White));

            var urlFont = family.CreateFont(24, FontStyle.Regular);

            var urlOptions = new TextOptions(urlFont)
            {
                Origin = new PointF(40, 80 + rect.Height),
                WrappingLength = 600,
                HorizontalAlignment = HorizontalAlignment.Left,
            };

            image.Mutate(x => x.DrawText(urlOptions, data.Url, Color.White));
        }

        using var ms = new MemoryStream();

        await image.SaveAsync(ms, new JpegEncoder());

        var imageData = ms.ToArray();

        await image.SaveAsJpegAsync(BuildFilePath());
    }

    static string BuildFilePath()
    {
        if (data is null)
        {
            throw new Exception("Post Data is null");
        }

        string rootDirectory = string.Empty;

        if (RuntimeInformation.IsOSPlatform(OSPlatform.OSX))
        {
            rootDirectory = "/Users/keith/Developer/kpwags.com/public/images/posts";
        }
        else if (RuntimeInformation.IsOSPlatform(OSPlatform.Windows))
        {
            rootDirectory = @"C:\Users\keith\Developer\kpwags.com\public\images\posts";
        }
        else
        {
            throw new Exception("Invalid Operating System");
        }

        var directory = Path.Join(rootDirectory, data.Directory);

        if (!Directory.Exists(directory))
        {
            Directory.CreateDirectory(directory);
        }

        return Path.Join(directory, "social-image.jpg");
    }
}
My template works well for me, but hopefully you can use this to build your own.
You can view the full source code on my GitHub Repository